Hey there, fellow photography enthusiasts! Have you ever looked out at a beautifully lit cityscape or a sky full of twinkling stars and just *wished* you could capture that magic, only to end up with a blurry mess or just a dark, underexposed shot?
Trust me, I’ve been there countless times, feeling that frustration of my camera not quite seeing what my eyes did. It used to feel like an impossible task, a secret skill only master photographers possessed.
But what if I told you that stunning night photography isn’t just for the pros with fancy gear anymore? With recent advancements in smartphone cameras and the incredible power of AI image processing, capturing those breathtaking nocturnal moments is more accessible than ever.
Whether you’re rocking the latest mirrorless camera or just your trusty iPhone, there are some seriously cool techniques and essential tips that can elevate your nighttime shots from “meh” to “wow!” I’ve personally experimented with countless settings and gadgets under the moonlit sky, and I’ve found that understanding just a few key principles can totally transform your results.
Get ready to ditch those blurry snaps and start creating some truly unforgettable images that pop on your social feeds and capture the imagination. Below, we’re going to dive deep into exactly how to master the art of night photography, whether you’re using a dedicated camera or just your smartphone, ensuring your photos are sharp, vibrant, and full of life.
We’ll explore everything from essential gear (yes, even for your phone!) to nailing those tricky camera settings like ISO, aperture, and shutter speed without getting lost in the technical jargon.
We’ll even peek into the future, looking at how AI is already revolutionizing how our devices handle low light. I’m going to share all my best secrets, proven strategies, and a few common mistakes to sidestep, so you can truly capture the ethereal beauty of the night.
Let’s make those dream-like nightscapes a reality, and trust me, you’ll be amazed at what you can achieve once you know the ropes! Below, we’re going to break it all down and get you snapping those epic night shots.
Cracking the Code: Unlocking Your Camera’s Nighttime Potential

Okay, let’s get real for a moment. When I first started venturing out with my camera after dark, it felt like I was trying to speak a different language. My camera just didn’t seem to ‘get’ what I was trying to capture, and I’d end up with either a pitch-black abyss or a grainy, blurry mess that looked nothing like the stunning scene before me. It was incredibly frustrating, and honestly, I almost gave up on night photography entirely! But through countless hours of trial and error (and maybe a few whispered expletives), I realized that the secret sauce isn’t some super expensive lens; it’s truly understanding the holy trinity of camera settings: ISO, aperture, and shutter speed. These three elements work together like a delicate dance, and once you learn their rhythm, the night truly opens up to you. It’s about finding that sweet spot where you let in enough light without introducing too much noise or blurring your amazing subject. Trust me, I’ve spent enough nights freezing my fingers off to figure out that a little bit of knowledge here goes a very long way. We’re talking about transforming those dark, disappointing shots into vibrant, detailed captures that really pop. It’s like discovering your camera has a secret superpower just waiting to be unleashed after sunset, and I’m here to tell you exactly how to tap into it.
Understanding ISO, Aperture, and Shutter Speed
Let’s demystify these terms because, frankly, they sound way more intimidating than they are. Think of ISO as your camera’s sensitivity to light. A lower ISO (like 100 or 200) gives you cleaner images but needs more light, which is tough at night. A higher ISO (say, 1600, 3200, or even 6400 on modern cameras) brightens your shot dramatically, but it also introduces ‘noise’ or graininess, which can make your photos look a bit fuzzy. It’s a trade-off, and finding the right balance for your specific camera and scene is key. Then there’s aperture, often denoted by ‘f-numbers’ (f/2.8, f/4, f/8, etc.). This controls how much light passes through your lens and also dictates your depth of field. A wider aperture (smaller f-number like f/2.8) lets in a lot of light, which is fantastic for dark scenes, but it means only a narrow part of your image will be in sharp focus. For wide nightscapes, I often find myself somewhere in the f/8 to f/11 range to keep everything looking crisp. Finally, shutter speed is exactly what it sounds like: how long your camera’s shutter stays open to capture light. At night, we often need longer shutter speeds – think seconds, not fractions of a second. This is where a tripod becomes non-negotiable, as even the slightest camera shake will turn your beautiful night scene into a blurry mess. Experimentation is your best friend here; start with a base, take a shot, and adjust!
Mastering Manual Mode for Night Photography
If you’ve been relying on your camera’s auto modes, night photography is where you’ll want to take the leap into manual. I know, I know, it sounds scary, but trust me, it’s incredibly empowering. Auto mode just can’t make the creative decisions needed for capturing compelling night scenes. It doesn’t know if you want star trails, sharp cityscapes, or a milky way shot. When I first switched to manual for night shooting, it felt like I was finally in control, able to tell my camera *exactly* what I wanted it to do. Start by setting your camera to ‘M’ for Manual. From there, you’ll be able to independently adjust ISO, aperture, and shutter speed. A common starting point for a static night scene (like a cityscape or a landscape under moonlight) might be: ISO 400-800, aperture f/8, and a shutter speed of 10-30 seconds. This gives you a baseline to work from. If your shot is too dark, you can increase your ISO or lengthen your shutter speed. If it’s too bright, reverse those changes. The beauty of digital photography is that you can take as many photos as you like and review them instantly. This instant feedback loop is how I learned what worked and what didn’t in different nocturnal environments. Don’t be afraid to push the limits of your camera’s ISO or try incredibly long exposures; that’s where the magic truly happens!
Building Your Night Photography Toolkit: More Than Just a Camera
You know, for years, I thought getting better night photos meant buying a fancier camera. While better gear certainly helps, I’ve discovered that some of the most impactful improvements came from accessories that weren’t even that expensive. It’s not about having the flashiest kit; it’s about having the *right* tools for the job. And believe me, when you’re out there in the dark, wrestling with your gear, you quickly learn what’s truly essential. There have been so many times I’ve been out on a chilly night, trying to compose a shot, only to realize I forgot a crucial piece of equipment. Those moments taught me valuable lessons about preparation. My backpack for a night shoot now looks quite different than it used to, packed with specific items that have become absolute game-changers. Whether you’re a DSLR/mirrorless shooter or primarily use your smartphone, there are a few unsung heroes that will absolutely transform your night photography experience from a struggle into a creative joy. These aren’t just recommendations; these are items I personally rely on, almost religiously, every time I venture out after sunset. They streamline the process, enhance stability, and ultimately, help you capture those truly breathtaking shots you’ve been dreaming of.
The Unsung Hero: Your Tripod and Remote Shutter
I cannot stress this enough: a sturdy tripod is not optional for night photography; it is absolutely, 100% mandatory. If you take away anything from this post, let it be this. When you’re using shutter speeds of several seconds (which you will be!), even the slightest vibration from your hand will introduce blur. I remember one early attempt at a cityscape where I thought I could just brace my camera on a railing. The results were universally blurry and disappointing. That’s when I invested in my first good tripod, and it was a revelation. It instantly elevated my photos from “shaky snapshots” to “crisp compositions.” Look for a tripod that’s stable, even in breezy conditions, and can support the weight of your camera and lens without wobbling. Beyond the tripod, a remote shutter release (or a camera with a built-in timer) is your next best friend. Pressing the shutter button directly can introduce camera shake, even on a tripod. A remote release, whether wired or wireless, allows you to trigger the shot without touching the camera at all, ensuring maximum sharpness. If you don’t have one, just use your camera’s 2-second timer; it works wonders. These two items, more than any lens upgrade, will dramatically improve the clarity and sharpness of your night photos.
Smart Accessories for Smartphone Night Shooters
Thinking that professional night photography is only for big cameras? Think again! Modern smartphones, especially with their computational photography wizardry, are incredibly capable at night. But just like their big siblings, they benefit immensely from a few key accessories. My absolute go-to for smartphone night photography is a small, portable tripod. There are tons of affordable options out there, from flexible ‘gorilla pod’ style tripods to more traditional mini tripods with phone mounts. Just like with a dedicated camera, stability is paramount for long exposures. Next, consider a small, portable LED light panel. I’ve used these for subtle light painting or to illuminate a foreground subject just enough to make it pop without overexposing the background. They’re super versatile and can often be adjusted for color temperature and brightness. Lastly, don’t underestimate the power of a good external lens kit if you want to expand your creative options. Wide-angle and even telephoto lenses designed for smartphones can open up new compositional possibilities for capturing expansive night skies or distant city lights. Paired with your phone’s excellent night mode, these accessories can help you create stunning, professional-looking night photos right from your pocket!
Painting with Light: Creative Techniques for Dazzling Night Shots
Night photography isn’t just about capturing what’s already there; it’s also a canvas for incredible creativity. This is where I really started to fall in love with it, moving beyond just documenting a scene to actually *creating* something unique. I remember the first time I successfully tried light painting – it felt like pure magic! Armed with nothing more than a cheap flashlight, I “drew” in the air while my camera’s shutter was open, and seeing those glowing trails appear in the final image was an absolute thrill. It’s an active, engaging way to interact with your environment, transforming ordinary darkness into an extraordinary visual spectacle. The possibilities are truly endless, and it allows you to inject your personality and artistic vision into every shot. If you’ve ever felt limited by traditional photography, then light painting and embracing creative long exposures will absolutely blow your mind. It’s about looking at the night not as an absence of light, but as an opportunity to introduce and manipulate light in ways that daytime photography simply can’t offer. Let’s dive into some techniques that will make your night shots truly stand out from the crowd.
The Art of Light Painting and Star Trails
Light painting is one of the most fun and accessible creative techniques in night photography. All you need is a light source – a flashlight, your phone screen, even glow sticks – and a camera on a tripod set for a long exposure (think 10 seconds to several minutes). While the shutter is open, you can move your light source to “draw” shapes, highlight parts of your scene, or even create ethereal glows. I once used a small LED light to illuminate the inside of an abandoned barn under a starry sky, giving it an otherworldly feel. It’s all about experimentation and seeing what unexpected results you can get. For star trails, you’re looking at much longer exposures, sometimes hours! Instead of individual stars, you’ll capture their movement across the night sky as streaks of light. Many photographers achieve this by taking a series of shorter exposures (e.g., 30 seconds each) and then ‘stacking’ them together in post-processing software, which effectively simulates one very long exposure and reduces noise. The key is a clear, dark sky and a very stable tripod. There’s something incredibly humbling and beautiful about capturing the Earth’s rotation in such a visible way; it’s a profound experience to create such images.
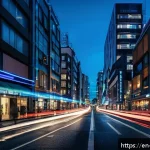
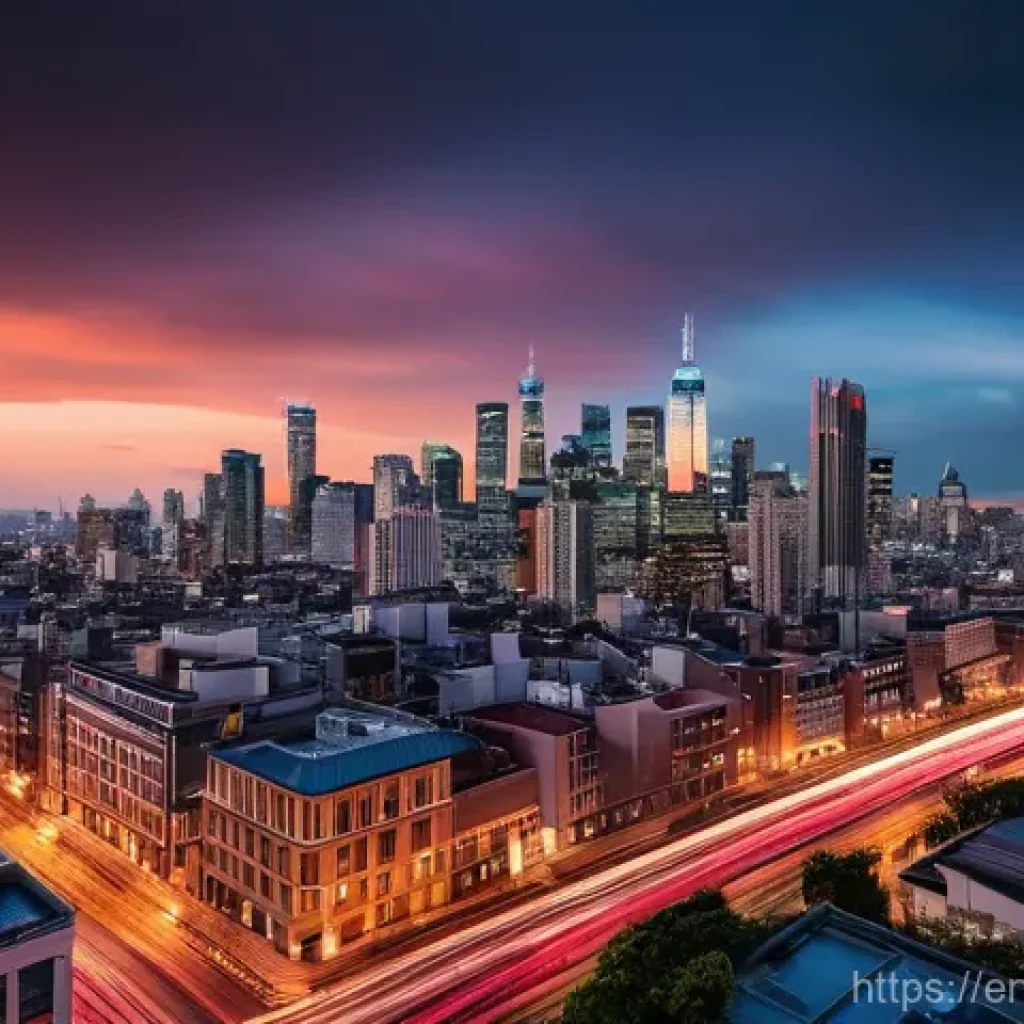
Capturing Light Streaks and Cityscapes
Cityscapes at night are a personal favorite, and capturing the dynamic energy of traffic with light streaks is a technique that always gets a “wow” reaction. It’s relatively straightforward but incredibly effective. The idea is to use a long shutter speed (anywhere from 5 to 30 seconds, depending on the speed of traffic and how much streaking you want) while cars drive by. Their headlights and taillights will transform into vibrant lines of color, weaving through your static cityscape. The key here is finding a good vantage point, often from a bridge, an elevated platform, or a tall building, looking down on busy streets. I’ve spent countless evenings perched over bridges, just waiting for the perfect flow of traffic, and the patience always pays off. Also, don’t forget the static elements of the cityscape itself – the illuminated buildings, neon signs, and streetlights. Using a slightly wider aperture (like f/8 or f/11) helps keep everything in focus, giving you that beautiful, sharp urban sprawl contrasted with the flowing light. It’s a fantastic way to convey the bustling energy of a city after dark.
The Darkroom Digital: Post-Processing Your Nocturnal Masterpieces
Let’s be honest: even the best night shot straight out of the camera often needs a little love. This isn’t cheating; it’s an essential part of the artistic process, just like developing film in a traditional darkroom. I used to think that a perfect photo meant no editing, but I quickly learned that for night photography, post-processing is where your images truly come alive. It’s where you can recover details hidden in the shadows, pull out vibrant colors that your camera sensor barely registered, and dramatically reduce the dreaded noise that often plagues low-light shots. My workflow has evolved significantly over the years, and I’ve tried countless programs and techniques. What I’ve settled on is a process that focuses on enhancing what’s already there, making the image look even closer to what my eyes saw (or what I envisioned) that magical night. It’s an incredibly satisfying part of the journey, transforming a good capture into an absolutely breathtaking one that commands attention. Don’t skip this step; it’s where you put your personal stamp on the final product and really make those stars sparkle or those city lights glow with intensity.
Essential Editing Tips for Bringing Out Details
When I start editing a night photo, my first focus is often on exposure and contrast. Night shots can sometimes look a bit flat or underexposed straight out of the camera, especially if you were trying to preserve highlights. I gently nudge up the exposure, being careful not to blow out any bright lights, and then play with the shadows and highlights sliders to recover detail. Often, increasing the shadows reveals incredible texture in foreground elements or distant landscapes. A slight bump in clarity and dehaze can also do wonders for giving definition to your night sky or architectural elements, making them pop against the darkness. Color temperature is also crucial; sometimes night shots can have a strong color cast (often orange from city lights or blue from moonlight). Adjusting the white balance to a cooler or warmer tone can dramatically change the mood. I often experiment to see what feels most natural or artistic for the particular scene. And don’t forget sharpening! A little bit of sharpening, applied carefully, can bring out the fine details in stars or distant buildings, but be wary of over-sharpening, which can introduce artifacts and enhance noise.
Noise Reduction: Keeping Your Images Clean
Ah, noise – the bane of every night photographer’s existence! It’s that grainy, speckled texture that appears in darker areas of high-ISO images. While some cameras handle high ISOs better than others, almost every night shot will benefit from some level of noise reduction in post-processing. I’ve spent countless hours trying to perfect this, and I’ve found that a gentle hand is always best. Most editing software (Lightroom, Photoshop, Capture One, even free options) has dedicated noise reduction tools. There are usually two types: luminance noise reduction (for the graininess) and color noise reduction (for colored speckles). I always start with color noise reduction, as it’s often very effective at cleaning up unsightly splotches without sacrificing much detail. For luminance noise, I apply it more cautiously. Too much luminance noise reduction can make your image look smooth and plasticky, losing all its fine details. It’s a delicate balance. I usually zoom in to 100% or 200% on a dark, featureless area of the image to see the effect clearly, then adjust until the noise is significantly reduced but the overall image still looks natural and sharp. It’s a painstaking but necessary step to ensure your night photos look as pristine as possible.
Smartphone Superpowers: Elevating Your Mobile Night Game
I remember a time, not that long ago, when trying to take a decent photo with my phone at night was a joke. You’d get a dark, blurry mess, maybe a few blown-out light sources, and a whole lot of pixelated regret. Fast forward to today, and honestly, the advancements are nothing short of astounding. My phone, which I always have with me, has become an unexpectedly powerful tool for capturing incredible nocturnal scenes. It’s not just about convenience; it’s about genuinely impressive image quality, thanks to what’s happening *behind* the lens – the incredible world of computational photography and AI. I’ve personally been blown away by what my latest iPhone can do in low light, often capturing scenes that would have previously required a dedicated camera. It’s changed how I approach spontaneous night shots and has become a fantastic companion to my mirrorless camera. If you thought your phone was just for daylight snaps, you’re missing out on a whole new dimension of creative potential after dark. This isn’t just about taking a quick snapshot; it’s about harnessing sophisticated technology to create genuinely artistic and high-quality night images.
Leveraging AI and Computational Photography
So, what’s the secret sauce behind your phone’s newfound night vision? It’s all thanks to AI and computational photography. When you activate ‘Night Mode’ on your smartphone, it’s not just taking one picture. It’s actually rapidly capturing a burst of multiple images at different exposures, analyzing them, and then intelligently stitching them together. The AI then processes this information to reduce noise, correct colors, and enhance details, all in a matter of seconds. It’s truly mind-boggling. I’ve watched my phone transform a seemingly dark and underexposed preview into a bright, detailed image right before my eyes. This technology effectively simulates the long exposure and careful noise reduction techniques that dedicated cameras achieve, but with an automated, user-friendly approach. Understanding that your phone is doing all this complex work in the background can help you guide it. For example, holding your phone as still as possible (or even better, on a mini tripod) allows it to capture more frames cleanly, leading to an even better final image. Don’t be afraid to let your phone’s AI do the heavy lifting; it’s incredibly good at it!
Recommended Apps and Settings for Your Phone

While your phone’s native camera app usually has an excellent night mode, there are also third-party apps that can give you even more control, mimicking a manual mode on a dedicated camera. Apps like Halide, ProCamera, or even specialized long-exposure apps allow you to manually adjust ISO, shutter speed, and focus, giving you creative freedom beyond what the stock app offers. I’ve experimented with these, and they can be fantastic for specific shots, especially if you’re looking to get a bit more technical. However, for most everyday night photography, the built-in night mode on modern iPhones (Night Mode) and Android devices (like Google Pixel’s Night Sight or Samsung’s Night Mode) is exceptionally good. The key is knowing how to use it effectively. When your phone detects low light, it will often automatically suggest activating night mode and display a timer (e.g., 3s, 5s). You can usually tap this icon to manually adjust the duration of the exposure. A longer duration generally means a brighter, more detailed, but also potentially noisier, image. Experiment with these settings in different low-light scenarios to find what works best for your specific phone and the scene you’re trying to capture. It’s amazing what a little tweak can do!
Common Pitfalls and Pro Tips: What I’ve Learned the Hard Way
When you’re out there, in the quiet of the night, trying to capture that perfect shot, it’s easy to get caught up in the moment. But over the years, I’ve stumbled into (and thankfully, learned from) countless mistakes that could have been easily avoided. From blurry images that left me kicking myself to missing out on once-in-a-lifetime shots because of a simple oversight, I’ve seen it all. These aren’t just technical blunders; sometimes they’re about preparation or even safety, things you only truly appreciate after experiencing a setback. I want to share these hard-won lessons with you so you don’t have to make the same errors I did. Think of this as a shortcut to smarter, safer, and ultimately more successful night photography. My goal is for you to come home with a memory card full of stunning images, not a head full of regrets. This isn’t just about camera settings; it’s about the entire experience of shooting after dark, from scout to shot to safety. Let’s make sure your night adventures are filled with triumphs, not troubleshooting!
Avoiding Blurry Shots and Underexposure
The number one killer of night photos is blur. Hands down. I’ve been there, thinking my tripod was stable enough, or that my hand was rock-steady for a 1-second exposure. Nope. Any movement will ruin a long exposure. My golden rule is: use a tripod always, and use a remote shutter or a 2-second timer. It sounds simple, but it makes an enormous difference. Another common issue is underexposure, especially when you’re trying to capture a dark scene like the Milky Way. Our eyes see better than the camera sensor in extreme darkness. Don’t be afraid to push your ISO higher than you might think necessary, or extend that shutter speed. Modern cameras are surprisingly good at handling noise, and a slightly noisy but properly exposed image is always better than a clean, but underexposed and muddy one. You can always reduce noise in post-processing, but you can’t magically add light that wasn’t captured. Check your histogram after each shot – it’s a much more reliable indicator of exposure than just looking at the screen in the dark. If the data is all bunched up on the left, you’re likely underexposed.
Finding the Perfect Spot and Staying Safe
Location, location, location! It’s true for real estate, and it’s doubly true for night photography. Light pollution from cities can drastically impact your ability to see and capture stars. Use light pollution maps (search for ‘dark sky map’ online) to find truly dark locations within a reasonable driving distance. I’ve driven hours to get away from city glow, and it’s always worth it for those clear, starry skies. But finding the perfect spot also means scouting during the day. What looks like a clear path at night could be a treacherous trail in the dark. Look for interesting foreground elements – a lone tree, a rock formation, an old building – that can add depth and storytelling to your nightscape. And on that note, safety is paramount. Always tell someone where you’re going and when you expect to be back, especially if you’re venturing into remote areas alone. Bring extra layers of clothing, a headlamp (with a red light setting to preserve your night vision), a fully charged phone, and even a power bank. Snacks and water are also a good idea. Being prepared not only keeps you safe but also allows you to focus on the creative aspect without worrying about practical concerns. Trust me, I’ve been caught unprepared more than once, and it’s no fun!
The Evolution of Night Photography: What’s Next for Our Cameras
It’s truly incredible to witness how rapidly night photography has evolved, even in just the last few years. What used to be the exclusive domain of dedicated pros with heavy, expensive gear is now accessible to almost anyone with a mid-range camera or even a modern smartphone. This isn’t just about incremental improvements; we’re seeing fundamental shifts in how our devices “see” and interpret light in the darkest conditions. I often find myself thinking back to my early days of struggling with noise and blur, and then looking at the crisp, vibrant images I can capture now – it feels like science fiction! This rapid pace of innovation isn’t slowing down, either. From advancements in sensor technology to increasingly sophisticated computational algorithms, the future of night photography promises even more breathtaking possibilities. It’s exciting to imagine what we’ll be able to achieve in the coming years, and how these technologies will further democratize the art of capturing the night. I’m always on the lookout for the next big thing, and what’s on the horizon for our cameras is truly something to anticipate with great enthusiasm.
Cutting-Edge Sensor Technology and Image Stabilization
At the heart of any great night shot is the camera sensor, and manufacturers are constantly pushing the boundaries here. We’re seeing sensors that are larger, more sensitive to light (meaning better low-light performance at lower ISOs), and capable of incredible dynamic range. This translates directly to cleaner images with more detail in both shadows and highlights, which is a game-changer for night photography. I remember when a noisy ISO 1600 was the limit, but now, some full-frame cameras can produce remarkably clean images at ISO 6400 or even higher! Coupled with this, in-body image stabilization (IBIS) has become incredibly effective. While it doesn’t replace a tripod for very long exposures, it can significantly reduce blur in handheld shots with shorter shutter speeds, allowing for more flexibility in spontaneous night photography. I’ve personally been amazed at being able to get sharp handheld shots at 1/15th or even 1/8th of a second, which was unthinkable just a few years ago. These technological leaps mean that our cameras are becoming more capable and forgiving, making it easier for everyone to capture stunning night scenes.
The Future of Computational Photography and AI
While sensor tech gets us part of the way, the real revolution, especially for smartphones, is in computational photography and AI. This is where multiple exposures are combined, noise is intelligently removed, and details are enhanced, all through clever software algorithms. We’re already seeing features like ‘Night Sight’ on Google Pixels or ‘Night Mode’ on iPhones producing results that rival dedicated cameras in some situations. But what’s next? I predict even more sophisticated AI that can not only reduce noise but intelligently *add* detail where it’s missing, or perfectly balance extremely high-contrast scenes (like a brightly lit city against a dark sky) without human intervention. We might see cameras that can predict and correct for slight movements, or even use AI to recommend optimal compositions in low light. Imagine a camera that can detect a faint nebula and automatically suggest the best settings to capture it! The line between what the lens sees and what the software renders is blurring, and it’s creating exciting new possibilities for capturing the unseen beauty of the night. It’s a truly thrilling time to be a night photographer!
Maximizing Your Engagement: The Art of Storytelling in Night Photography
Capturing a technically perfect night photo is one thing, but making it truly memorable and engaging for your audience is another entirely. I’ve learned that the most impactful images aren’t just sharp and well-exposed; they tell a story, evoke an emotion, or spark curiosity. This is where the ‘influencer’ part of being a photographer comes in. It’s not enough to just share a pretty picture; you want people to stop scrolling, to lean in, and to feel something. I’ve experimented a lot with how I present my work, both in terms of the images themselves and the captions or narratives that accompany them. It’s about creating a connection, inviting people into the experience you had out there under the stars or amidst the city lights. This approach not only resonates more deeply with viewers but also dramatically increases engagement, which is fantastic for growing your presence and, yes, even for monetization through things like Adsense, where longer dwell times and clicks are king. Let’s explore how you can weave compelling narratives into your nocturnal imagery.
Crafting a Narrative: Beyond Just the Shot
Every photo has a story, but at night, those stories often become even more atmospheric and intriguing. Instead of just posting an image with a simple title, think about the journey. Where were you? What challenges did you face? What emotions did you feel standing there in the dark, capturing that scene? For example, instead of “City at Night,” I might write, “Battling the biting wind atop the Empire State Building, this panorama truly captures the restless heart of New York, a city that never sleeps, even under a cloak of stars.” This adds depth and personal connection. Think about the sounds, the smells, the temperature, and how they influenced your experience. Did you wait for hours for the perfect moment? Did you overcome a technical challenge? Sharing these personal anecdotes makes your content relatable and unique, setting it apart from generic stock photos. People connect with authentic experiences, and your night photography adventures are full of them. Use your captions to share a piece of your soul and invite others to dream alongside you.
Engaging Your Audience and Building Community
Beyond the photo itself, how you interact with your audience is crucial for engagement. Don’t just post and walk away! Ask questions in your captions: “What’s your favorite spot for night photography?” or “Have you ever tried light painting?” This encourages comments and creates a dialogue. Respond to every comment, even if it’s just a quick “Thanks for sharing!” or “Glad you enjoyed it!” Building a community around your passion is incredibly rewarding. I’ve found that people love seeing behind-the-scenes glimpses. Share a quick video of you setting up your tripod, a time-lapse of your star trail shots, or even a ‘before and after’ of your editing process. This not only shows your expertise but also makes the whole process feel more human and accessible. Hosting Q&A sessions about night photography, either through stories or live streams, can also be a fantastic way to connect directly with your followers, answer their burning questions, and establish yourself as a trusted authority in the field. Remember, people follow people, not just pretty pictures!
| Night Photography Essentials | Dedicated Camera Shooters | Smartphone Shooters |
|---|---|---|
| Tripod | Heavy-duty, stable tripod with good height | Compact, portable mini tripod or flexible tripod (e.g., Gorillapod) |
| Shutter Release | Wired/wireless remote or camera’s 2-second timer | Headphone remote, Bluetooth remote, or phone’s self-timer |
| Lighting | Headlamp with red light option, small LED panel for light painting | Small portable LED light panel, phone flashlight for subtle fills |
| Lens (if applicable) | Fast wide-angle lens (f/2.8 or wider) is highly recommended | External wide-angle lens attachment for expansive views |
| Power | Extra camera batteries, power bank for phone/accessories | Power bank for extended phone usage |
| Safety Gear | Warm layers, headlamp, map, water, first-aid kit | Warm layers, headlamp, let someone know your location, water |
Wrapping Up Our Night Adventure
And there you have it, fellow night explorers! From demystifying those intimidating camera settings to venturing into the realm of light painting and mastering your smartphone’s nocturnal prowess, we’ve covered quite a bit. My journey into night photography has been one of continuous learning, filled with incredible moments of awe and, let’s be honest, a fair share of chilly nights. But every single time, seeing those breathtaking images emerge from the darkness makes it all incredibly worthwhile. I genuinely hope this guide inspires you to grab your camera, embrace the night, and start creating your own stunning visual stories. The world truly transforms after sunset, and your camera is your passport to capturing its hidden magic. Don’t be afraid to experiment, make mistakes, and most importantly, have fun under the stars!
Handy Tips for Your Next Night Shoot
1. Always scout your location during the day. This helps you plan compositions, identify potential hazards, and understand the terrain before darkness sets in, making your night shoot much smoother and safer.
2. Pack extra batteries and a power bank. Long exposures, cold weather, and continuous shooting drain batteries faster than you think, especially for both your camera and your phone. Trust me, running out of juice mid-shoot is a frustrating experience!
3. Dress in layers. Even on a seemingly mild evening, temperatures can drop significantly after sunset, and standing still for long periods can make you feel colder. Warm hands and feet make a world of difference.
4. Learn to love your histogram. It’s your camera’s most accurate way of showing you if your image is properly exposed, far more reliable than judging brightness on a small LCD screen in the dark. Aim for data that’s not crushed too much on either end.
5. Don’t forget a headlamp with a red light setting. Red light preserves your night vision, allowing your eyes to remain adjusted to the darkness, which is crucial for framing shots and navigating without blinding yourself or others.
Key Takeaways for Night Photographers
Ultimately, night photography is about embracing the challenge and rewarding yourself with truly unique images. Remember that a sturdy tripod and a remote shutter are non-negotiable for sharp, blur-free results. Don’t shy away from manual mode; it’s where you unlock your creative control over ISO, aperture, and shutter speed. Computational photography in smartphones is a powerful ally, but dedicated accessories like mini tripods can elevate those shots even further. Experiment with light painting and long exposures to inject personal artistry into your captures. Finally, post-processing is your digital darkroom, essential for refining details and combating noise. Above all, prioritize safety, prepare thoroughly, and let your passion for capturing the unseen beauty of the night guide your lens. The stars are waiting!
Frequently Asked Questions (FAQ) 📖
Q: What are the absolute essential gear items I need for night photography, especially if I’m just starting out or using a smartphone?
A: Okay, so let’s talk gear because, let’s be real, a few key pieces can make a world of difference between a “meh” shot and a “WOW!” shot at night. When I first started, I thought I needed all the most expensive stuff, but I quickly learned that some basic essentials are truly game-changers.
For any night photography, whether you’re using a fancy mirrorless camera or just your phone, a sturdy tripod is your absolute best friend. Seriously, it’s non-negotiable.
Night shots almost always require longer exposure times to soak up enough light, and even the steadiest hands can’t beat a tripod for sharpness. I’ve been there, thinking I could just brace myself against a wall, only to regret it when I saw the slight blur later.
A good, stable tripod eliminates camera shake entirely. Beyond that, if you’re rocking a dedicated camera, a fast lens (think f/2.8 or wider aperture) will let in more light, which is crucial.
For smartphone users, a small, portable phone tripod and maybe a clip-on wide-angle lens can drastically improve your composition and stability. I even recommend a remote shutter release (or using your camera’s self-timer) to avoid any vibration from pressing the shutter button.
And don’t forget extra batteries! Long exposures drain power faster than you’d think, and there’s nothing worse than running out of juice just as the magic hour hits.
I’ve made that mistake a few times, and trust me, it’s incredibly frustrating!
Q: How can I avoid blurry or underexposed night photos and get those sharp, vibrant shots you talked about, especially when dealing with tricky settings like ISO and shutter speed?
A: This is the million-dollar question, isn’t it? We’ve all been there, reviewing our night shots only to find them either too dark to see anything or a blurry mess.
The key to nailing sharp and vibrant night photos really boils down to understanding the “exposure triangle” – that’s ISO, aperture, and shutter speed.
For night photography, my personal strategy starts with keeping your ISO as low as possible to minimize distracting noise, which becomes much more noticeable in dark areas.
I usually try to stick around ISO 100-800, depending on how much light is available. Next, I open up my aperture as wide as my lens allows (the lowest f-number, like f/2.8 or f/4) to let in maximum light.
This often means a shallower depth of field, but for cityscapes or stars, that can actually look fantastic. Finally, to compensate for the low ISO and wide aperture in dark conditions, you’ll need a longer shutter speed – this is where your trusty tripod comes in!
We’re talking several seconds, sometimes even 30 seconds or more, to gather enough light. When I’m shooting stars, I usually aim for around 15-20 seconds to get those beautiful star trails without too much blur.
If your photos are still coming out too dark, you might need to bump up your ISO slightly or extend your shutter speed even further. It’s a delicate balance, and honestly, it takes a bit of experimentation to find what works best for each unique scene.
I’ve spent many nights just playing with these settings until I got that perfect shot, and you’ll find your rhythm too!
Q: You mentioned
A: I and smartphones are making night photography easier. How exactly is AI helping, and can I really get ‘pro-level’ results with just my phone? A3: Oh, absolutely!
The advancements in smartphone photography, especially thanks to AI, are truly mind-blowing. Honestly, five years ago, getting a decent night shot with a phone felt like a pipe dream, but now?
It’s totally within reach for everyone. AI plays a massive role in what your phone can do in low light. When you switch to “Night Mode” on your iPhone or a similar setting on an Android device, AI is working behind the scenes to capture multiple frames at different exposures very quickly.
Then, it intelligently stitches them together, reducing noise, enhancing dynamic range, and sharpening details that would otherwise be lost in the dark.
It’s essentially doing complex post-processing right in your pocket, in real-time! I’ve been incredibly impressed with the results from my latest iPhone, and I often use it when I don’t want to lug around my heavier camera gear.
While it might not always match the flexibility or extreme low-light performance of a high-end dedicated camera with a super-fast lens, for most casual photographers and even for some stunning social media-worthy shots, a modern smartphone’s AI-powered night mode can absolutely deliver “pro-level” looking results.
Just remember, even with AI, the basic principles like stability (hello, phone tripod!) and good composition still apply. But yes, the convenience and quality are truly phenomenal, making night photography accessible in a way we could only dream of before.
It’s a testament to how far technology has come!