Lately, urban nightscapes have become the ultimate playground for fashion photographers eager to blend vibrant city lights with cutting-edge style. With cities buzzing after dark, capturing that elusive glow while highlighting fashion’s finest details has never been more exciting—or challenging.

If you’ve ever struggled to get the perfect shot in low light or felt overwhelmed by neon chaos, you’re not alone. In this post, I’ll share insider tips and personal experiences that transform nightscape shoots from daunting to dazzling.
Stick around, because mastering this art can seriously elevate your portfolio and set your work apart in today’s competitive fashion scene.
Harnessing Urban Glow for Fashion Impact
Playing with Artificial Light Sources
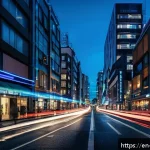
When you’re shooting fashion in an urban setting at night, the city’s artificial lights become your best creative ally—and sometimes your biggest headache.
Neon signs, street lamps, car headlights, and illuminated billboards offer a variety of colors and intensities that can either enhance or clash with your fashion subject.
My approach has always been to scout locations during both day and night to understand how these lights behave. For example, neon signs can add vibrant pops of color but often cast harsh shadows, so positioning your model just right is key.
I’ve found that using reflectors or small portable LED panels helps to balance these contrasts without washing out the dramatic city vibes.
Balancing Exposure Without Losing Detail
Getting the exposure right is tricky when you’re dealing with both bright artificial lights and deep shadows. The city lights can easily blow out highlights or create unwanted glare on glossy fabrics or metallic accessories.
From experience, shooting in RAW format is a must because it gives you the flexibility to recover details in post. Also, using a fast lens with a wide aperture (like f/1.8 or f/2.0) allows more light to hit the sensor, helping to keep ISO levels low and reduce noise.
I often use spot metering focused on the model’s face or clothing detail to make sure the fashion elements are sharp and well-lit, even if it means the background dips into silhouette territory.
Mixing Natural and Artificial Light for Depth
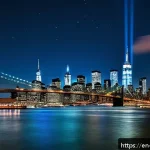
Sometimes, incorporating a little natural ambient light—like the fading twilight or moonlight—can add subtle depth and mood to your photos. I remember one shoot where the blue hour gave a soft cool tone to the sky, contrasting beautifully with warm street lamps.
Using a slow shutter speed allowed the city lights to streak and glow, while the model remained crisp with the help of a small off-camera flash. This blend of light sources creates a layered look that feels dynamic and alive, making your fashion images stand out from typical night shots.
Choosing the Right Gear for Nighttime Fashion Shoots
Essential Camera Settings and Lenses
In my experience, the best camera setup for night fashion photography includes a camera body with excellent high-ISO performance and fast prime lenses.
A 50mm f/1.4 or 85mm f/1.8 lens is usually my go-to because they offer sharpness and beautiful bokeh, which isolates the subject from busy city backgrounds.
Manual focus can sometimes be tricky in low light, so relying on autofocus with face detection or eye tracking really speeds up the workflow. For settings, I usually start with ISO 800-1600, aperture wide open, and adjust shutter speed to avoid motion blur unless that’s part of the artistic choice.
Tripods, Stabilizers, and Other Accessories
While handheld shooting is often necessary to capture spontaneous city moments, a tripod is invaluable for long exposures or creative light trails. Using a sturdy tripod with a remote shutter release reduces camera shake, letting you experiment with slower shutter speeds without sacrificing image quality.
For more dynamic shots, a gimbal or stabilizer can help smooth out movement if you’re filming video or doing motion stills. I also carry a small portable LED panel or ring light to fill in shadows on the model’s face without overpowering the urban ambiance.
Portable Power and Storage Solutions
Night shoots tend to last longer than you expect because you’re chasing the perfect light conditions and experimenting with angles. Having extra batteries and high-capacity memory cards on hand is a lifesaver.
I always bring at least two fully charged batteries and a couple of 128GB or larger cards. This way, I don’t have to stop mid-shoot to swap gear or offload images, maintaining the creative momentum and focus on the model and environment.
Styling and Wardrobe Tips for Nighttime Urban Shoots
Choosing Fabrics that React to Light
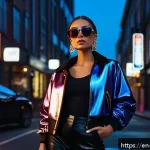
Night photography highlights textures and reflections differently than daylight. From personal shoots, I’ve noticed that materials like satin, leather, and sequins come alive under city lights, creating eye-catching reflections and depth.
Matte fabrics, on the other hand, absorb light and can look flat if not paired with the right lighting. For neon-heavy scenes, I recommend outfits with bold colors or metallic finishes that pop against dark backgrounds, making the model the undeniable focal point.
Color Coordination with City Tones
Matching or contrasting wardrobe colors with the urban palette can dramatically change the mood of your photos. For example, warm reds and oranges complement the glow of street lamps and neon, while cool blues and purples harmonize with LED and digital signage.
I like to experiment with color blocking—using one dominant color on the model and letting the city’s multicolored lights act as a vibrant backdrop. This technique helps create cohesion between the fashion and the setting, turning chaos into a curated visual story.
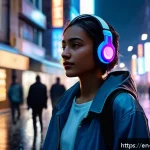
Accessories and Styling for Night Drama
Accessories like reflective sunglasses, metallic jewelry, or statement hats can add layers of intrigue in low light. When I styled a shoot around a downtown nightlife theme, adding oversized earrings and glossy boots helped accentuate the mood.
Just be mindful that some shiny accessories might cause unwanted glare or reflections, so test shots are crucial. Hair and makeup should also be adapted for night shoots—think dewy skin and bold highlights that catch the light, rather than flat or overly matte finishes.
Mastering Composition to Capture Urban Energy
Incorporating Architectural Elements
Cityscapes offer an incredible variety of lines, shapes, and textures that can frame your model and add storytelling depth. I often use building facades, staircases, or metal railings as leading lines to draw the viewer’s eye toward the fashion subject.
Shooting from low angles can amplify the city’s towering structures, making the model appear powerful and stylish against the urban backdrop. Experimenting with reflections in puddles or glass surfaces also creates interesting double exposures and adds a layer of abstraction.
Utilizing Movement and Motion Blur
Night photography gives you the opportunity to play with motion creatively. Capturing blurred car lights, pedestrians walking by, or even the model’s own movement adds energy and narrative to your images.
One trick I use is to combine a slower shutter speed with a flash freeze—this technique keeps the model sharp while the background blurs dynamically, emphasizing the city’s constant motion.
It takes some practice to get the timing right, but the results can be striking and highly memorable.
Balancing Negative Space and Detail

Urban nightscapes are often busy, with lots of visual “noise” from lights, signs, and crowds. To make your fashion subject stand out, I focus on isolating them with negative space—areas of the frame that are less cluttered or darker.
This can be achieved by positioning the model against a plain wall, a shadowed alley, or a softly lit corner. It’s a balancing act: too much empty space might feel lonely, but the right amount directs attention and enhances the fashion statement.
Effective Post-Processing Techniques for Night Fashion
Enhancing Colors Without Overdoing It
After a night shoot, post-processing is where the magic really happens. I like to boost saturation and contrast selectively, emphasizing the neon hues and skin tones while avoiding unnatural color shifts.
Using tools like HSL sliders in Lightroom allows me to target specific color ranges, making the city lights pop without affecting the model’s natural complexion.
Subtle vignettes also help focus the viewer’s gaze, creating a cinematic effect.
Noise Reduction and Sharpening Strategies
High ISO settings necessary for night photography often introduce noise, which can degrade image quality. My workflow includes applying noise reduction carefully—too much softens important details like fabric textures or facial features.
I prefer using dedicated noise reduction software or Lightroom’s luminance noise slider, paired with selective sharpening on the model’s eyes and clothing details.
This balance ensures the image stays crisp without looking overly processed.
Creative Color Grading and Mood Setting
Color grading can transform your night fashion photos from straightforward captures to mood-driven art pieces. For urban shoots, I often experiment with teal and orange splits or cooler blue tones to evoke futuristic or edgy vibes.
Alternatively, pushing warm tones creates a nostalgic, film noir feel. Playing with shadows and highlights during grading helps emphasize textures and shapes, making the fashion elements pop in a way that draws viewers in emotionally.
Lighting Setup Comparisons for Urban Fashion Shoots
| Lighting Type | Advantages | Challenges | Best Use Case |
|---|---|---|---|
| Neon and Street Lights | Vibrant colors, natural urban feel | Harsh shadows, color casts | Bold, edgy fashion with strong color contrast |
| Portable LED Panels | Controlled, consistent light; adjustable intensity | Can look artificial if overused | Highlighting details and balancing shadows on model |
| Off-Camera Flash | Freeze motion, shape light precisely | Requires skill to avoid harshness | Dynamic shots with crisp subject and blurred background |
| Ambient Natural Light (Blue Hour) | Soft, flattering, cinematic mood | Limited time window; low light challenges | Romantic or ethereal fashion stories |
Strategies for Working with Models After Dark
Communicating in Low-Light Conditions
Shooting at night means less visibility and often more distractions, so clear communication with your model is essential. I usually brief them thoroughly before heading out, discussing poses and mood so we’re on the same page.
On set, I rely on hand signals or a small flashlight to guide adjustments without breaking the flow. Encouraging the model to move slowly and confidently helps maintain focus and reduces mistakes caused by sudden, unseen movements.
Ensuring Comfort and Safety
Night shoots can be physically demanding and sometimes intimidating depending on the location. I always make sure my team and models are dressed warmly and have access to water and breaks, especially in colder months.
Choosing safe, well-lit locations or having an assistant to watch surroundings creates a secure environment. When shooting in busy urban areas, it’s crucial to keep an eye on traffic and pedestrians to avoid hazards while maintaining the creative process.
Inspiring Authentic Expressions and Poses
Capturing genuine emotion under artificial light can be tricky, but it’s what elevates fashion photography beyond the ordinary. I’ve found that sharing stories, music, or even jokes between takes helps models relax and connect with the mood.
Sometimes, asking them to interact with the environment—leaning on walls, walking through light pools, or engaging with nearby props—adds natural movement and energy.
The goal is to make the night feel less staged and more like a lived-in moment of style and attitude.
In Conclusion
Nighttime urban fashion photography offers a thrilling blend of creativity and challenge, where artificial lights become your artistic tools. By understanding light behavior, choosing the right gear, and styling thoughtfully, you can capture striking images that tell compelling stories. Remember, patience and experimentation are key to mastering this dynamic environment and making your fashion visuals truly shine.
Helpful Tips to Keep in Mind
1. Always scout your urban locations during both day and night to plan how artificial lights will interact with your subject.
2. Shoot in RAW format and use fast lenses to maintain image quality and flexibility during post-processing.
3. Incorporate a mix of natural ambient light and artificial sources to add depth and mood to your photos.
4. Choose fabrics and colors that react well to city lights, enhancing textures and ensuring your model stands out.
5. Prioritize clear communication and safety with your models, especially in low-light and busy urban environments.
Key Takeaways for Successful Night Urban Fashion Photography
Effective night fashion shoots hinge on mastering light control, from balancing harsh city lights to using supplemental lighting strategically. Selecting gear that performs well in low light and preparing with extra power and storage ensures smooth sessions. Styling choices that complement urban colors and textures amplify the visual impact, while thoughtful composition and movement bring energy and storytelling to your images. Above all, fostering a comfortable, collaborative atmosphere with your models leads to authentic expressions and memorable results.
Frequently Asked Questions (FAQ) 📖
Q: uestionsQ1: How can I effectively manage low light conditions during urban night fashion shoots?
A: Low light is definitely one of the trickiest parts of night photography, but it’s totally manageable with the right approach. I’ve found that using a fast lens with a wide aperture (like f/1.8 or wider) really helps capture more light without cranking up the ISO too much, which can cause grain.
Also, shooting in RAW format gives you flexibility to brighten shadows and recover details in post-processing. Don’t forget to stabilize your camera—whether with a tripod or steady hand techniques—to avoid blur from slower shutter speeds.
Lastly, embracing available city lights creatively, like neon signs or street lamps, can add a dynamic mood rather than fighting the darkness.
Q: What are some tips for balancing vibrant city lights with fashion details in photos?
A: Balancing bright city lights with subtle fashion details is an art in itself. From my experience, controlling exposure is key—meter for your subject’s face and outfit rather than the background lights to avoid silhouettes or washed-out highlights.
Using a reflector or a portable LED light can help fill in shadows without overpowering the ambient glow. Positioning your model to catch reflections or backlighting from neon signs can create stunning effects that highlight textures and colors.
Also, shooting during the blue hour (just after sunset) often provides a nice natural balance between ambient light and city illumination, making it easier to capture both elements beautifully.
Q: How do I avoid the chaos of neon colors overwhelming my fashion shots?
A: Neon chaos is a common challenge because those intense colors can easily distract from your subject. What’s worked well for me is to simplify the scene—choose locations where neon signage isn’t too cluttered, or frame shots tightly to isolate your model against one or two light sources.
Adjusting your white balance settings can also tone down overly saturated colors, keeping the focus on the fashion. Sometimes converting images to black and white or selectively desaturating certain hues during editing can create a more cohesive look.
Ultimately, it’s about using neon as a complement, not the main event, so your fashion still shines front and center.