Hey there, night photography enthusiasts! With the growing excitement around capturing city skylines and starry skies, knowing the perfect time to shoot can completely transform your photos.

Recently, more photographers are tapping into the so-called “magic hour” after sunset to create breathtaking nightscapes that truly pop. If you’ve ever struggled with dull or noisy night shots, this guide will shine a light on when to press the shutter for stunning results.
Stick around, because unlocking these ideal moments could be the game-changer your portfolio needs!
Discovering the Perfect Glow: When Light Meets the Night
Understanding the Transition from Daylight to Darkness
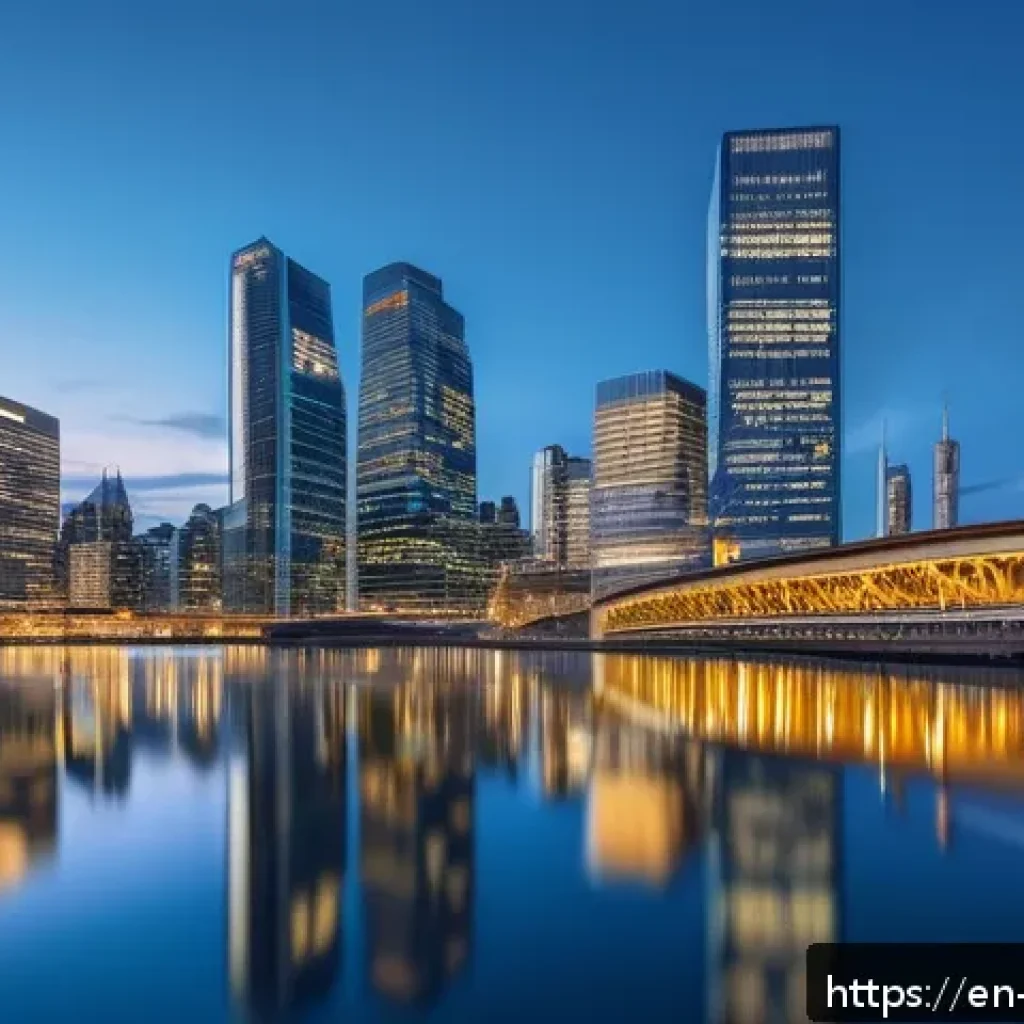
As the sun dips below the horizon, the world doesn’t just plunge into darkness instantly. There’s this beautiful, fleeting phase where the sky holds onto remnants of daylight, casting a soft, diffused glow that’s perfect for capturing depth and detail in your photos.
This period, often overlooked, offers a gentle blend of natural and artificial light, allowing your camera to seize vibrant colors without the harsh shadows typical of full night.
From my experience, shooting during this window brings out the best in cityscapes, where buildings light up but the sky still offers texture and color.
Chasing the City Lights: Balancing Exposure and Atmosphere
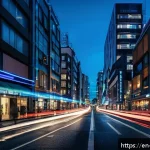
Once darkness truly sets in, artificial lights become the stars of your composition. But here’s the catch: shooting too late means losing that subtle natural light that helps balance your exposure.
I’ve found that catching the moment when street lamps, neon signs, and office windows flicker on while the sky still holds a hint of blue results in images that feel alive and dynamic.
It’s a tricky balance, but when you nail it, the contrast between warm city lights and cool twilight skies creates an irresistible mood.
How Weather and Season Influence Night Photography
Don’t forget that weather plays a huge role in how your night photos turn out. Clear skies reveal stars and sharper silhouettes, while clouds can add drama or soften harsh light.
Seasonal changes also affect the timing of this magical phase—summer evenings hold onto light longer, whereas winter nights come quicker. I always check local sunset times and weather forecasts before heading out, which saves me from the frustration of missed opportunities and helps plan gear and settings accordingly.
Mastering Your Camera Settings for Night Brilliance
Optimizing ISO Without Sacrificing Quality
Night photography often tempts us to crank up ISO for brighter images, but that comes with the risk of noisy, grainy shots. Through trial and error, I learned to keep ISO as low as possible—usually around 800 to 1600—depending on my camera’s sensor performance.
Pairing this with a stable tripod allows me to extend exposure times without motion blur, preserving crispness and detail. The key is to balance sensitivity with stability to get clean, vibrant photos that don’t look artificially brightened.
Choosing the Right Aperture for Depth and Sharpness
A wide aperture like f/1.8 might sound tempting to let in more light, but it often results in a shallow depth of field that blurs important background details.
For cityscapes and starry skies, I usually settle around f/5.6 to f/8. This range maintains sharpness across the frame and brings out architectural lines and star points clearly.
Adjusting aperture based on your lens and desired effect helps you capture scenes that feel immersive and well-defined.
Shutter Speed: Finding the Sweet Spot for Motion and Exposure
Long exposures are a hallmark of night photography, but knowing exactly how long to leave the shutter open can be tricky. From my hands-on experience, exposure times between 10 to 30 seconds work well for static scenes, capturing ambient light and star trails without overexposing city lights.
For scenes with movement—like passing cars or people—I experiment with shorter exposures or intentional blurs to add energy and storytelling. The interplay between shutter speed and other settings is where you get creative control.
Unlocking Starry Skies: Techniques Beyond the Urban Glow
Finding Dark Skies Away from Light Pollution
Shooting stars demands getting away from city lights, which can wash out the night sky. I remember one trip to a nearby national park where the absence of artificial light transformed the sky into a tapestry of stars.
Planning your location is crucial; use apps that track light pollution levels and moon phases to pick the best nights for astrophotography. Even a modest drive out of town can make a world of difference in the clarity and brilliance of your star shots.
Capturing the Milky Way: Timing and Composition Tips
The Milky Way is a breathtaking subject but requires precise timing and framing. I learned that the core of the Milky Way is visible during certain months and peaks late at night, so timing your shoot between April and October often yields the richest results.
Composing your shot with an interesting foreground—like a lone tree or mountain silhouette—adds scale and drama. Patience and multiple test shots help dial in focus and exposure to bring the galaxy’s glow into stunning detail.
Stacking and Post-Processing for Cleaner Night Skies
Noise reduction is a common challenge in star photography. I’ve started using stacking techniques where multiple exposures are combined to enhance signal and reduce grain.
Software tools like DeepSkyStacker or Photoshop make this process manageable even for beginners. Post-processing also lets you tweak contrast and color balance, making stars pop against the dark sky without losing natural texture.
It’s a game-changer that turns raw captures into breathtaking, polished images.
Essential Gear and Accessories for Nighttime Excellence
Tripods: The Unsung Heroes of Sharp Night Shots
No matter how good your camera is, shaky hands can ruin night photos. Investing in a sturdy tripod has been a revelation for me—once I stopped handholding and started using a solid base, my shots improved dramatically.
Look for tripods with adjustable legs and a smooth ball head for easy framing. Bonus points if it’s lightweight enough to carry on long hikes but stable enough to resist wind.
Remote Shutter Releases and Timers for Vibration-Free Shots
Pressing the shutter button manually can cause subtle vibrations that blur images during long exposures. Using a remote shutter release or your camera’s built-in timer helps eliminate this problem.
I often set a 2-second delay to ensure the camera is perfectly still before capturing. This simple step dramatically increases sharpness, especially when shooting star trails or cityscapes with delicate details.
Additional Tools: Headlamps, Extra Batteries, and Lens Warmers
Night photography sessions often extend into chilly hours, and being prepared makes all the difference. A headlamp with a red light mode keeps your hands free while preserving your night vision.
Carrying extra batteries is a must, as long exposures and cold weather drain power faster. Lens warmers or hand warmers prevent condensation on your glass during humid or cold nights, saving you from frustrating blurs and lost shots.
Planning and Timing Strategies for Consistent Night Photography Success
Using Apps to Track Sunsets, Moon Phases, and Weather
I can’t stress enough how much apps like PhotoPills and The Photographer’s Ephemeris have changed my approach. They provide accurate times for golden hours, blue hours, moonrise, and moonset, as well as light pollution maps.
This info lets you plan shoots well in advance, reducing guesswork and increasing your chances of capturing perfect conditions. Checking weather forecasts for cloud cover is equally important to avoid wasted trips.
Scouting Locations During Daylight for Better Night Shots
I always scout my locations during the day before shooting at night. This helps me understand the layout, identify interesting foreground elements, and find safe spots to set up gear.
Familiarity with the area also speeds up composition and reduces stress when darkness falls. Plus, scouting lets you anticipate any light sources or obstructions that might affect your shots.
Experimenting with Angles and Perspectives for Unique Results
Night photography doesn’t have to be repetitive. I encourage trying different angles, like shooting reflections in puddles or framing city lights through arches or windows.
Low-angle shots can exaggerate light trails and add dramatic foreground interest. I’ve found that changing perspective can turn a cliché skyline into a fresh, captivating image that stands out in a crowded portfolio.
Understanding Light Pollution and Its Impact on Night Imagery

Identifying Sources of Light Pollution in Urban Areas
Light pollution is the bane of night photography, especially for those of us chasing stars or subtle nightscape details. Streetlights, billboards, and building illumination all contribute to a sky that’s brighter than it should be.
By walking around or using light pollution maps, you can pinpoint areas to avoid or approach strategically. Sometimes, positioning your shot to exclude direct light sources makes a big difference.
Techniques to Minimize Light Pollution Effects
When avoiding light pollution isn’t an option, I’ve learned to use physical filters like light pollution reduction filters that block certain wavelengths.
Adjusting camera settings to limit overexposure and shooting during moonless nights also helps. In post-processing, selective darkening and contrast adjustments can reduce the haze caused by light pollution, restoring some of the night’s natural magic.
Balancing Artificial and Natural Light for Striking Compositions
Rather than fighting light pollution, sometimes embracing it adds character to your shots. For example, the glow from city lights can create a warm ambiance or highlight architectural details.
I try to balance these artificial lights with whatever natural light remains, using them to guide the viewer’s eye or enhance mood. This approach has resulted in some of my favorite images, where the interplay between human and natural elements tells a compelling story.
| Time Window | Characteristics | Ideal Camera Settings | Best Subjects |
|---|---|---|---|
| Golden Hour (Sunset to 30 min after) | Warm light, soft shadows, vibrant colors | ISO 100-400, aperture f/4-f/8, shutter 1/60-1/125s | City skylines with sunset hues, reflective surfaces |
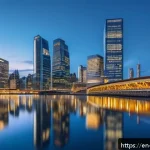
| Blue Hour (30 min to 1 hour after sunset) | Cool tones, balanced ambient and artificial light | ISO 400-800, aperture f/5.6-f/8, shutter 5-15s | Illuminated buildings, bridges, calm water reflections |
| Night (After blue hour) | Dark sky, city lights dominate, star visibility varies | ISO 800-1600, aperture f/5.6-f/11, shutter 10-30s | Star trails, light trails, detailed architecture |
| Late Night (After midnight) | Minimal artificial light, darkest skies, less noise | ISO 1600+, aperture f/2.8-f/5.6, shutter 15-30s | Milky Way, stars, quiet urban scenes |
Creative Approaches to Elevate Your Night Photography Portfolio
Incorporating Motion for Dynamic Storytelling
Static scenes are beautiful, but adding motion can bring your night photos to life. I often experiment with light trails from cars or the subtle movement of clouds to add energy and flow.
Using long exposures to capture these elements creates images that feel alive and tell a story beyond just a still frame. It’s a technique I recommend trying, even if it means multiple attempts to get the timing just right.
Playing with Reflections and Symmetry
Water puddles, glass windows, or wet streets can act as natural mirrors, doubling the impact of your composition. I’ve discovered that shooting just after a rain shower opens up fantastic opportunities to capture reflections that add depth and symmetry.
Positioning yourself low to the ground amplifies this effect, making ordinary scenes look magical and more immersive.
Mixing Natural and Artificial Elements for Unique Moods
Combining natural phenomena like fog, mist, or moonlight with urban lighting creates moods that stand out. I remember a foggy night shoot where the streetlights cast halos through the mist, transforming a simple street into an ethereal scene.
Don’t shy away from experimenting with weather and light combinations—they often surprise you with unexpected beauty.
Common Challenges and How to Overcome Them
Dealing with Noise and Image Clarity
Noise can quickly degrade night photos, especially with higher ISO settings. Beyond stacking images, I’ve found that shooting in RAW and carefully applying noise reduction in post-processing preserves details better than aggressive in-camera noise reduction.
Also, ensuring your lens is clean and using manual focus helps avoid softness that can be mistaken for noise.
Managing Exposure in Mixed Lighting Conditions
When scenes have both bright artificial lights and dark shadows, achieving a balanced exposure is tough. I use bracketing—taking multiple shots at different exposures—and then blend them during editing.
This technique captures the full dynamic range, preserving highlights without losing shadow details. It’s a bit more work but pays off in rich, balanced images.
Staying Safe and Comfortable During Night Shoots
Night photography often means working in low-light and sometimes isolated locations. I always bring a friend when possible and carry a fully charged phone and emergency supplies.
Dressing in layers, bringing snacks, and planning your route ahead of time keeps the experience enjoyable and safe. Comfort and security let you focus fully on creativity without distractions.
Building Your Night Photography Skills Through Practice
Setting Personal Projects and Goals
To keep improving, I set specific goals like capturing a star trail or a certain skyline at blue hour. These challenges push me to research, plan, and experiment.
It’s a motivating way to develop new techniques and build a diverse portfolio that reflects your evolving style.
Learning from Mistakes and Reviewing Your Work
Not every night shoot turns out perfect, and that’s part of the journey. I make it a habit to review my shots critically, noting what worked and what didn’t.
This reflection helps me adjust settings, timing, or composition for next time, turning mistakes into valuable lessons.
Joining Communities and Sharing Your Progress
Engaging with other night photographers through online forums or local groups has been incredibly inspiring. Feedback, tips, and shared experiences accelerate learning and keep motivation high.
Plus, sharing your work publicly helps build confidence and connect with like-minded creatives who appreciate the magic of night photography.
In Conclusion
Night photography offers a unique blend of challenges and rewards that transform ordinary scenes into captivating stories. Mastering the interplay of natural and artificial light, along with the right gear and techniques, opens up endless creative possibilities. With patience and practice, anyone can capture the magic that unfolds when light meets the night.
Helpful Tips to Remember
1. Plan your shoots around the golden and blue hours to take advantage of natural light transitions.
2. Use a sturdy tripod and remote shutter release to ensure sharp, vibration-free images.
3. Scout locations during daylight to find interesting compositions and safe spots.
4. Monitor weather and moon phases using photography apps for optimal shooting conditions.
5. Embrace creative techniques like motion, reflections, and mixing light sources to add depth and mood.
Key Takeaways
Understanding the nuances of light during twilight and night is essential for stunning photos. Balancing ISO, aperture, and shutter speed helps maintain image quality while capturing the atmosphere. Proper preparation—including scouting, gear readiness, and safety measures—ensures a smooth and enjoyable experience. Finally, continuous learning through experimentation and community engagement fuels growth and creativity in night photography.
Frequently Asked Questions (FAQ) 📖
Q: uestions about the Best Time for Night PhotographyQ1: What exactly is the “magic hour” for night photography, and why is it so special?
A: The “magic hour,” often called the blue hour, happens shortly after sunset when the sky takes on a deep blue hue before turning completely dark. This window usually lasts about 20 to 40 minutes, depending on your location and the season.
What makes it special is the perfect balance of natural and artificial light—city lights start to glow, and the sky still holds some color, giving your photos a dreamy yet sharp contrast.
Shooting during this time helps avoid the harshness of full darkness and reduces noise, resulting in richer, more vibrant nightscapes.
Q: How can I know the exact time for the magic hour in my city?
A: I’ve found that using smartphone apps like “Golden Hour” or “PhotoPills” is a game-changer. These tools calculate the magic hour precisely based on your GPS location and date, showing you the start and end times in real-time.
You can also check local weather apps to ensure clear skies, which greatly impact the quality of your shots. Personally, setting reminders for this time has saved me from missing those fleeting moments when the light is just right.
Q: What camera settings work best during the magic hour for night photography?
A: From my experience, starting with a wide aperture (around f/2.8 to f/4) helps gather enough light without sacrificing sharpness. Use a low ISO (between 100-400) to minimize noise, especially since the light isn’t fully dark yet.
A tripod is essential because shutter speeds might range from a few seconds up to 20 seconds depending on your scene. Don’t forget to experiment with white balance—sometimes setting it to “Tungsten” or manually adjusting can enhance the blues in the sky.
Most importantly, take multiple shots and adjust as you go; that’s how I capture those stunning, crisp nightscapes.