As an English blog influencer, here’s my take on a description for a drone night photography post:Hey, fellow visionaries and photography enthusiasts!
Ever found yourself gazing at a city skyline after dark, or perhaps a serene landscape under a blanket of stars, and wished you could capture that magic from a whole new perspective?
I know I have! Drone photography has already revolutionized how we see the world from above during the day, but let me tell you, when the sun goes down, that’s when things get truly spectacular.
With the latest advancements in drone camera technology – think larger sensors, wider apertures, and incredible low-light performance, often boasting f/1.7 or f/2.8 capabilities, even in compact models like the DJI Mini 3 Pro – capturing breathtaking nocturnal scenes is more accessible than ever.
But let’s be real, shooting at night comes with its own set of exhilarating challenges, from navigating tricky light pollution to battling wind and ensuring your drone remains rock-steady for those epic long exposures.
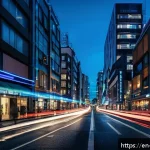
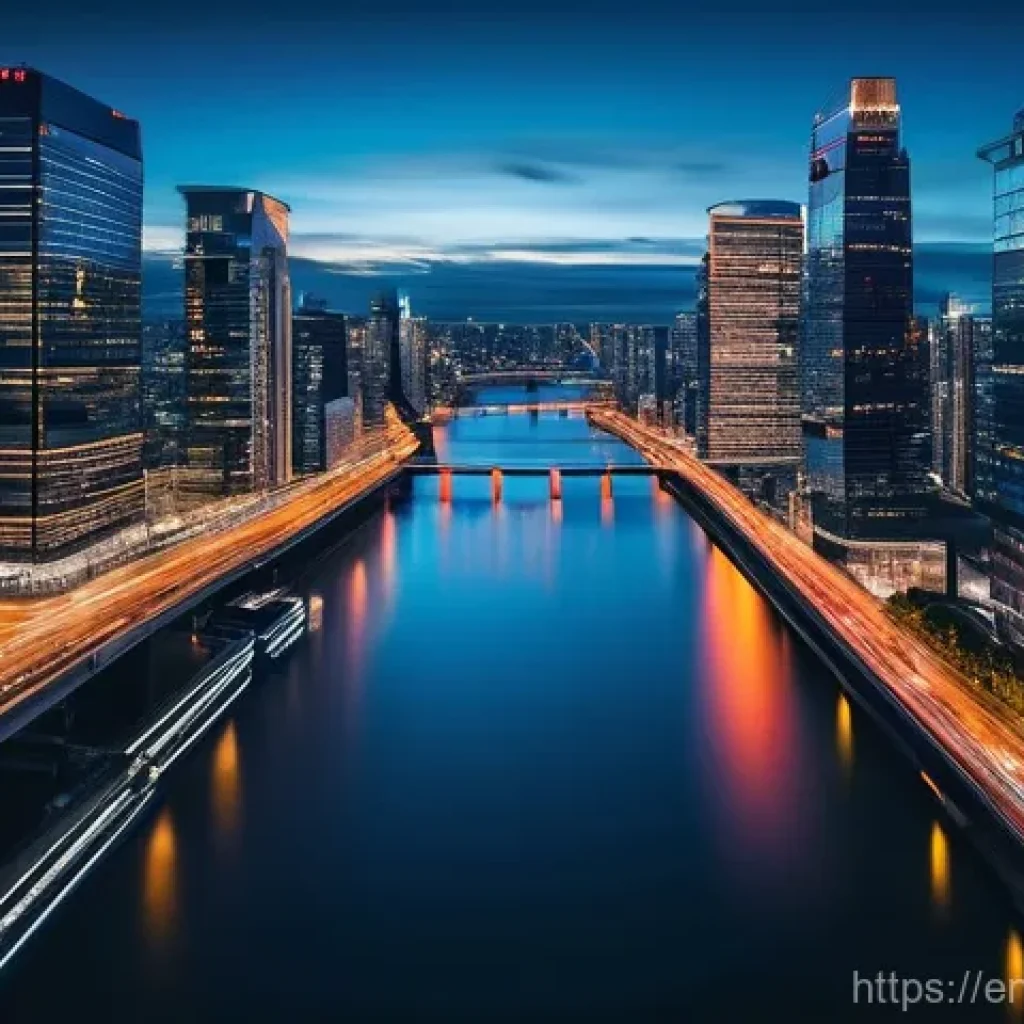
Trust me, I’ve had my fair share of blurry shots and “where did my drone go?!” moments in the dark! Yet, the rewards are absolutely phenomenal: shimmering cityscapes transformed into rivers of light, dramatic moonlit vistas, and even the subtle glow of distant stars made visible through careful technique.
It’s an art form that truly pushes your creative boundaries, blending technical expertise with an adventurer’s spirit. From what I’ve seen, the trend for stunning aerial shots is only going to soar in 2025, with more brands and creatives jumping on board.
We’re seeing integrated AI for autonomous flight and smarter cameras that can handle challenging environments with features like NightSense AI. It’s all about knowing your gear, understanding the light, and having the courage to experiment.
If you’re anything like me, you’re always chasing that next incredible shot, and night drone photography offers a canvas unlike any other. So, are you ready to unlock the secrets to truly mesmerizing aerial night photos and videos?
Let’s dive in and explore exactly how to make your nocturnal drone visions a dazzling reality!
Unlocking the Night: Gearing Up for Low-Light Aerials

Stepping into the world of night drone photography, the first thing I learned – often the hard way! – is that your daytime gear might not cut it. It’s a whole different beast out there, and having the right tools makes all the difference between a blurry, noisy mess and a truly breathtaking shot. When I first started, I thought my standard drone would be fine, but quickly realized the limitations of smaller sensors in truly low-light conditions. I’ve personally found that drones with larger sensors, like those in the DJI Mavic 3 series or even some of the higher-end Autel Evo models, really shine here. They capture more light, which translates directly to less noise and more detail in your night photos and videos. It’s not just about the drone itself, though. Think about your controller – a bright screen is a must for framing your shots in the dark, and a reliable connection is non-negotiable when you can’t easily see your drone. And let me tell you, running out of battery mid-flight over a shimmering cityscape is a heart-stopping experience I wouldn’t wish on anyone, so extra intelligent flight batteries are an absolute must. For anyone serious about making night drone photography a regular thing, investing in these essentials isn’t just a recommendation; it’s a game-changer that elevates your work from amateur attempts to professional-grade artistry. It truly feels like having a secret weapon in your creative arsenal, opening up possibilities you never thought existed.
The Right Drone for the Job
When it comes to drones for night work, sensor size is king. A 1-inch sensor or larger, often found in models like the DJI Air 2S or Mavic 3 Classic, will give you a significant advantage. These larger sensors can gather more light, which means less digital noise in your images and better dynamic range in those tricky high-contrast night scenes. I’ve experimented with various models, and while my DJI Mini 3 Pro does an admirable job for its size, especially with its f/1.7 aperture, the difference a larger sensor makes in terms of image quality at high ISOs is truly noticeable. Look for drones that also offer robust manual camera controls, allowing you to fine-tune your ISO, shutter speed, and aperture. This level of control is absolutely critical for balancing exposure and avoiding blown-out highlights or crushed shadows. Don’t forget about stability too; a drone that can hold its position steadfastly in potentially gusty night winds is vital for those long exposure shots where even a slight wobble can ruin everything.
Essential Accessories You Can’t Fly Without
Beyond the drone itself, a few key accessories will significantly improve your night flying experience. First, reliable strobes or anti-collision lights are paramount for safety and legal compliance, especially in many regions that require them for night operations. I use LumeCubes or similar bright, lightweight strobes attached to my drone; they make it so much easier to maintain visual line of sight. Secondly, extra batteries are non-negotiable. Night flights, especially with long exposures, tend to drain power faster, and you don’t want to cut a session short because you’re low on juice. I always pack at least three fully charged batteries. Thirdly, a high-quality, fast SD card is crucial for capturing large RAW files quickly. Lastly, a good quality headlamp with a red light option can be incredibly useful – red light helps preserve your night vision while still allowing you to see your gear and surroundings without disturbing your dark adaptation.
Mastering the Art of Flight in the Dark
Flying a drone at night adds a whole new layer of challenge and excitement. It’s not just about pointing and shooting; it’s about feeling your way through the darkness, relying on your instincts and technology in equal measure. My first few night flights were definitely nerve-wracking. The familiar landmarks disappear, and the sense of depth changes dramatically. This is where really knowing your drone’s flight characteristics comes into play. I’ve spent countless hours practicing in open fields during twilight just to get a feel for how my drone responds when visual cues are minimal. It’s a bit like learning to drive stick shift in the dark – you know the theory, but the practical application requires a different kind of finesse. The key is to fly slowly, methodically, and always keep an eye on your telemetry data. Your drone’s onboard sensors and GPS become your best friends, guiding you through an environment that’s visually deceptive. Remember, while the thrill of capturing a unique night scene is immense, safety should always be your number one priority. I always double-check my flight path and potential obstacles multiple times before even taking off, especially when planning complex shots. It’s this meticulous preparation that allows you to truly relax and focus on the creative aspect once you’re airborne.
Navigating by Feel and Tech
Without the aid of clear visual references, navigating at night becomes an exercise in precision and trust in your drone’s systems. I tend to rely heavily on the drone’s FPV (First Person View) feed, but also keep one eye on the map view on my controller for orientation. It’s surprising how quickly you can lose your bearings when everything looks like abstract blobs of light. Setting clear waypoints or points of interest before you even launch can be a lifesaver, especially if you’re planning a specific flight path. I’ve found that using the “tripod” or “cine” mode on my DJI drones, which dampens controls and slows movement, is incredibly useful for smooth, stable flight at night. This allows for more precise positioning and less jerky movements, which is crucial for both photography and videography. The slower pace also gives you more time to assess your surroundings and make minor adjustments without rushing.
Holding Still for Stellar Shots
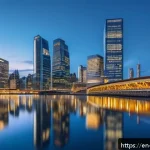
For those incredible long-exposure shots that transform headlights into glowing ribbons and still water into a silky mirror, rock-solid stability is paramount. Even the slightest drift can introduce blur. This is where a drone with excellent GPS and visual positioning systems truly shines. I’ve noticed a significant improvement in sharpness when flying my drone in areas with strong GPS signals and clear ground textures for its optical sensors to lock onto. If you’re flying in areas with weaker GPS, perhaps due to tall buildings or dense tree cover, you’ll need to be extra vigilant and potentially use manual inputs to counteract any drift. One trick I often use is to engage any intelligent flight modes that offer enhanced stability, like a stable hover mode, once I’ve positioned the drone for the shot. Sometimes, if the wind is really pushing it, I’ll even slightly overexpose and then recover in post-processing to minimize noise from having to boost the ISO too much to compensate for a faster shutter speed.
Dialing In Your Drone Camera Settings for Nocturnal Magic
This is where the real artistry begins, and honestly, it’s also where most beginners stumble. Think of your drone’s camera settings as your paintbrush for the night canvas. What works perfectly during the day will likely give you an unusable image after sundown. I remember my first few attempts were either pitch black or so blown out with light trails they looked like abstract art, not photos! It’s all about understanding the delicate dance between ISO, aperture, and shutter speed. There’s no single “best” setting, as every night scene is different – a bustling city street requires a different approach than a moonlit forest. My go-to strategy is usually to start with a low ISO to minimize noise, then adjust the shutter speed to gather enough light, and finally, use the aperture to fine-tune the depth of field. This iterative process is what separates a snapshot from a carefully crafted image. Don’t be afraid to experiment; the beauty of digital photography is that you can take countless shots without extra cost. I’ve often found that pushing the boundaries of what I thought was possible with my drone’s camera has led to some of my most unique and cherished photographs. It’s a continuous learning curve, but incredibly rewarding.
Balancing ISO, Aperture, and Shutter Speed
For night photography, your aperture will usually be wide open (the lowest f-number your lens allows, like f/1.7 or f/2.8) to let in as much light as possible. This is your foundation. From there, you’ll manage your ISO and shutter speed. I generally try to keep my ISO as low as possible – usually 100 or 200 – to avoid excessive noise, especially in the shadows. Then, I adjust the shutter speed. For static scenes, I’ll go for longer exposures, often 2-5 seconds, to really gather light and create those smooth, ethereal effects on water or moving clouds. For cityscapes with moving traffic, I might opt for an even longer exposure, perhaps 8-15 seconds, to turn car lights into streaks. If there’s some ambient light, like a bright moon or streetlights, you might be able to use a slightly faster shutter speed. It’s a constant juggle, and often involves taking a few test shots to find that sweet spot where the image is bright enough without being overexposed and noisy.
White Balance Wisdom After Dark
White balance at night can be tricky because artificial lights cast various color temperatures. Streetlights can be orange (tungsten), commercial buildings often have cool blue (fluorescent) or greenish hues, and moonlight is typically a very cool blue. While auto white balance might seem convenient, I’ve found it often gets confused in complex night scenes, leading to inconsistent color casts. I almost always shoot in RAW, which gives me immense flexibility to adjust white balance in post-processing without losing quality. However, if you want to get it right in-camera, I’d suggest experimenting with Kelvin temperature settings. Starting with a slightly warmer Kelvin value (around 3000-4000K) can often help neutralize the overly cool tones of artificial light and moonlight, bringing a more natural warmth to your images. Don’t be afraid to try different presets like “Tungsten” or “Fluorescent” and see how they affect the scene, then fine-tune from there.
Battling the Glow: Conquering Light Pollution
Ah, light pollution – the bane of every night photographer’s existence, especially when you’re trying to capture the subtle beauty of a starlit sky. Living near a major city, I know this struggle all too well. It’s like trying to see a faint whisper in a roaring stadium! The artificial glow from urban centers can completely wash out the delicate light of stars and create an orange haze that contaminates your images. But don’t despair! Over the years, I’ve developed a few strategies that have really helped me reclaim the night sky for my drone photography. It often involves a bit of travel, some careful planning, and a dose of clever post-processing. It’s truly a testament to how much effort we photographers put in to get that perfect shot, navigating not just the elements but also the human-made obstacles. I’ve found that even a short drive away from the densest city lights can make a dramatic difference, revealing stars you didn’t even know were there. And remember, sometimes the challenge itself pushes you to be more creative with your compositions, turning light pollution into an interesting element rather than just a nuisance.
Scouting for Pristine Dark Skies
The single most effective way to combat light pollution is to get away from it. I regularly use online light pollution maps, like those provided by DarkSky.org, to scout for the darkest locations within a reasonable driving distance. These maps clearly show areas with minimal light domes, which are ideal for astrophotography with your drone. Look for national parks, rural areas, or even large open fields far from towns. When you’ve identified a promising spot, it’s also a good idea to check local regulations regarding drone flight at night in that specific area. Some places have stricter rules, so a quick check can save you a lot of hassle. I’ve personally driven an hour or two out of my way to find a spot with a truly dark sky, and the results were absolutely worth the effort – the stars just pop against the blackness, and your drone can capture that incredible vista.
Filters and Post-Processing Tricks
While getting to a dark location is best, sometimes it’s not possible. That’s where light pollution filters come in. These specialized filters, often called “natural light” or “night sky” filters, are designed to block specific wavelengths of light emitted by common artificial sources like sodium vapor lamps. I’ve had some success using them to reduce the orange glow in urban nightscapes. However, be aware that they can sometimes introduce a color cast to your image, so careful white balance adjustment is key. In post-processing, programs like Adobe Lightroom or Photoshop offer powerful tools for noise reduction and color correction. I often use the dehaze slider or adjust specific color channels to neutralize unwanted color casts. Selective adjustments, like masking off parts of the sky, can also help clean up areas affected by light pollution without impacting the rest of your image. It’s a balancing act, but with practice, you can significantly improve your night shots even in less-than-ideal conditions.
Crafting Compelling Compositions Under the Stars

When the world is bathed in darkness, composition takes on an even more critical role. It’s not just about capturing light; it’s about shaping it, guiding the viewer’s eye, and telling a story with the limited elements available. I’ve found that night photography often forces you to simplify your compositions, focusing on strong shapes, dramatic light sources, and negative space. It’s a fantastic exercise in visual storytelling! My personal favorite technique is using artificial lights within the scene to create leading lines or interesting patterns. Think of a highway at night, where car headlights and tail lights become streaks of pure energy, drawing your gaze deep into the frame. Or consider the reflections of city lights on a calm body of water, creating a mesmerizing double image. The darkness itself can become a powerful compositional element, accentuating the illuminated subjects and adding a sense of mystery and drama. Don’t be afraid to experiment with unusual angles or perspectives that only a drone can achieve. I’ve captured some truly unique shots by flying directly above illuminated structures, looking straight down, or by using a low, sweeping angle to emphasize scale against a vast night sky. It’s about seeing the familiar world in an entirely new light – or lack thereof! – and translating that vision into a captivating image.
Drawing Eyes with Light and Lines
At night, light becomes your primary tool for guiding the viewer’s eye. Look for natural or artificial light sources that can create leading lines. Roads, bridges, illuminated pathways, or even strings of streetlights can form powerful compositional elements. I love how a long exposure can transform these static lights into dynamic, flowing lines that lead your eye from the foreground deep into the background. Reflections are another incredible asset at night. Water – lakes, rivers, even wet streets after a rain shower – can mirror the lights of a city, creating stunning symmetrical compositions. When I’m scouting a location, I’m always looking for these reflective surfaces. Sometimes, a carefully placed drone shot can turn an ordinary scene into something truly extraordinary simply by capturing these interplay of light and reflection. It’s about seeing beyond the obvious and finding those hidden visual treasures that only emerge after dark.
Long Exposures: Rivers of Light and Star Trails
Long exposure photography with a drone is, in my opinion, one of the most exciting aspects of night aerials. It’s where magic truly happens. By leaving your drone’s shutter open for several seconds, you can transform moving lights into ethereal streaks. Car lights become vibrant ribbons of red and white, creating dynamic energy in cityscapes. Moving boats on water turn into glowing trails. For those adventurous enough to tackle astrophotography, very long exposures (often requiring multiple stacked images in post-processing) can even begin to reveal star trails, where the earth’s rotation causes stars to appear as arcs of light in your image. This requires extreme stability and patience, but the results are absolutely breathtaking. I’ve personally spent hours perfecting these shots, and the feeling of capturing something so visually unique is truly unparalleled. Remember to use a remote trigger or timed shutter release to avoid any camera shake during these critical long exposures.
Safety First: Navigating Night Sky Regulations
Before you even think about launching your drone into the night sky, you absolutely, positively need to be aware of the rules and regulations. Trust me on this one; getting caught flying illegally or unsafely can lead to hefty fines, drone confiscation, and even legal trouble. It’s not worth the risk for a photo. Every country and often even local municipalities have specific rules regarding drone operations, and these rules are frequently stricter for night flights. In the United States, for example, recreational flyers need to pass The Recreational UAS Safety Test (TRUST) and follow FAA guidelines, which include maintaining visual line of sight and operating in authorized airspace. Commercial operators have additional requirements, often needing specific waivers for night operations. Always, always check the current regulations before you fly. I make it a point to review my local airspace using apps like B4UFLY before every single flight, day or night. It’s better to be safe than sorry, and frankly, knowing you’re flying legally gives you immense peace of mind, allowing you to focus on getting that perfect shot without worrying about unwelcome attention from authorities. It’s a part of being a responsible and professional drone pilot.
Knowing Your Local Airspace
Understanding the airspace you’re operating in is paramount. Apps like B4UFLY (in the US) or similar local aviation authority apps are invaluable. They show you controlled airspace (like near airports), restricted zones, and temporary flight restrictions (TFRs). Flying at night near an airport is an absolute no-go without specific authorization and communication with air traffic control. Even in uncontrolled airspace, you still have responsibilities. Always be aware of any local ordinances regarding drone flight, especially in urban areas or near private property. Some cities have outright bans on drone flight, or specific curfews. I’ve learned that a quick search of the local government’s website for “drone regulations [city/state name]” can save a lot of headaches. It’s not just about avoiding trouble; it’s about being a considerate member of the community and ensuring the safety of others.
Pre-Flight Checks for Peace of Mind
Night flights demand an even more rigorous pre-flight checklist. Visual inspection is harder, so you need to be extra thorough. I always ensure all propellers are securely attached and free from damage. My batteries are always fully charged, and I check their health status. Crucially, I calibrate my drone’s compass before every flight, as magnetic interference can be more pronounced in certain urban environments. I also make sure my drone’s firmware is up to date, as manufacturers often release updates that improve stability and GPS performance. And don’t forget your strobes! Ensure they are fully charged and securely attached, providing bright, visible anti-collision lighting. My personal routine includes a quick test hover at a low altitude to confirm all systems are functioning correctly before ascending to my desired altitude for shooting. This meticulous approach minimizes risks and lets me concentrate on the creative aspects of night photography.
The Editing Bay: Bringing Your Night Visions to Life
Once you’ve landed your drone and transferred those precious RAW files, the real magic of night photography often happens in the editing bay. This is where you can truly transform a good shot into an absolutely stunning masterpiece. I’ve spent countless hours in front of my computer, refining details and coaxing out the hidden beauty in my night images. Raw files, especially from drones, often look a bit flat straight out of the camera, but they hold an incredible amount of information that you can unlock with the right editing techniques. It’s a process of enhancement, not invention. Think of it as polishing a rough diamond. My go-to software is usually Adobe Lightroom and Photoshop, but there are many other fantastic options out there. The key is to be patient and methodical. Don’t rush the process, and learn to identify what your image needs. Sometimes it’s just a simple adjustment to exposure and contrast; other times, it might require more intricate local adjustments or advanced noise reduction. The transformation can be incredibly satisfying, turning a seemingly ordinary night scene into something truly cinematic and impactful. This is where your unique artistic vision truly comes to life, giving your aerial shots that signature style that makes them stand out.
Tackling Noise and Boosting Clarity
Noise is the arch-nemesis of night photography, and your drone’s camera, even with a good sensor, will likely introduce some. My first step in editing night shots is always aggressive noise reduction, usually in Lightroom or Topaz DeNoise AI. I start by carefully adjusting the luminance noise slider to smooth out grain without sacrificing too much detail. Color noise reduction is also crucial to remove any blotchy color artifacts. After noise reduction, I then focus on boosting clarity and sharpness. I use the clarity slider sparingly, as too much can make the image look artificial. Instead, I rely on subtle sharpening and often apply a slight dehaze to bring back some definition in the darker areas. Local adjustments, like applying a brush with increased clarity to specific areas of interest (like illuminated buildings), can also help make details pop without over-processing the entire image. It’s a delicate balance, but essential for a clean, professional-looking night photo.
Creative Color Grading for Mood
Color is incredibly powerful in night photography, and careful color grading can dramatically alter the mood and impact of your images. I often start by adjusting the white balance to achieve a pleasing overall color cast, whether I want a cooler, more mysterious blue tone or a warmer, inviting amber glow. Then, I dive into the HSL (Hue, Saturation, Luminance) panel to fine-tune individual colors. For instance, I might desaturate the greens slightly to emphasize urban lights, or subtly boost the blues in the sky to enhance the feeling of night. Split toning or color grading tools in Lightroom and Photoshop are fantastic for adding specific color tones to the highlights and shadows, creating a rich, cinematic look. I also play with the tone curve to deepen blacks and subtly brighten mid-tones, giving the image more punch and contrast. Remember, the goal isn’t to create an unnatural image, but to enhance the existing colors and light to evoke the emotion you felt when you captured the shot. It’s about making your nocturnal vision truly shine.
| Setting | Recommendation | Why it Matters |
|---|---|---|
| Aperture | Widest possible (e.g., f/1.7 – f/2.8) | Maximizes light intake, crucial for low light. |
| ISO | As low as possible (100-400) | Minimizes digital noise in your images. |
| Shutter Speed | Varies (1s – 15s+) | Adjust to control light trails, motion blur, and overall brightness. Longer for static scenes, shorter for more defined moving objects. |
| White Balance | Manual (2800K – 4500K) or Custom | Avoids inconsistent color casts from artificial lights; gives you control. |
| File Format | RAW | Retains maximum image data for flexible post-processing, especially noise and color correction. |
| Focus Mode | Manual Focus at Infinity | Ensures sharp focus on distant subjects in low light where autofocus struggles. |
Bringing It All Together
Whew, we’ve covered a lot of ground tonight, haven’t we? Diving into night drone photography truly opens up a whole new world of creative possibilities, and honestly, it’s been one of the most exciting aspects of my drone journey. There’s something incredibly satisfying about transforming a seemingly dark and ordinary scene into a vibrant, ethereal masterpiece with your drone. It takes patience, a little bit of technical know-how, and a healthy dose of courage to fly when the sun goes down, but the rewards are absolutely breathtaking. I hope sharing my experiences and the lessons I’ve learned – sometimes through trial and error! – helps you feel more confident and inspired to take your drone out after dark. Remember, every flight is a learning opportunity, and every shot, even the imperfect ones, contributes to your growth as an aerial photographer. So go on, embrace the night, and let your drone unveil its hidden beauty!
Handy Tips to Keep in Mind
1. Always double-check local drone regulations for night flying; they can be stricter than daytime rules, and safety always comes first.
2. Pack extra, fully charged batteries – night flights, especially with long exposures, tend to consume power faster, and you don’t want to cut your creative flow short.
3. Shoot in RAW to maximize your flexibility in post-processing, particularly for noise reduction and color correction, which are crucial for night images.
4. Master manual camera settings (ISO, aperture, shutter speed, white balance) to gain full control over your exposure and achieve the best possible image quality in challenging low-light conditions.
5. Consider the “blue hour” – the period just after sunset or before sunrise – for a magical balance of ambient light and city glows, creating a stunning backdrop for your aerial shots.
Important Reminders
At the end of the day, successful night drone photography boils down to a few core principles: rigorous pre-flight preparation, unwavering adherence to safety regulations, and a willingness to experiment with your camera settings. It’s about leveraging the unique perspective of your drone to capture the hidden beauty of the night, while always staying aware of your surroundings and your craft’s capabilities. Don’t be afraid to push your creative boundaries, but always prioritize a safe and responsible flight. Keep practicing, keep exploring, and those stunning nocturnal aerials will follow!
Frequently Asked Questions (FAQ) 📖
Q: What are the absolute must-have settings or techniques for getting clear, bright night photos with my drone?
A: This is probably the question I get asked most often, and for good reason! When the sun dips, your drone’s camera needs a little extra love to really shine.
From my own adventures under the stars, the biggest game-changer is mastering your manual settings. You absolutely want to shoot in RAW – trust me on this, it gives you so much more flexibility in post-processing to pull out those hidden details and correct colors without introducing nasty noise.
For aperture, open it up as wide as your drone allows, thinking f/1.7 or f/2.8 on many of the newer models, to let in maximum light. Shutter speed is where the magic really happens for night shots.
You’ll be using longer exposures, anywhere from 2 to 10 seconds, depending on how much ambient light you have. This means you absolutely need a super stable drone, ideally one with excellent wind resistance, and you’ll want to fly as still as possible.
And ISO? Keep it as low as you can to avoid graininess, typically starting around 100-400 and only going higher if absolutely necessary. What I’ve found personally is that a slightly longer exposure at a lower ISO always beats a shorter exposure with a super high ISO for clarity.
Don’t forget to use your drone’s tripod mode if it has one – it locks the drone in place, reducing drift for those precious long exposures!
Q: How do I deal with light pollution or really dark areas when I’m trying to capture stunning night shots?
A: Ah, the eternal struggle of the urban night photographer! Light pollution can be a real headache, turning a potentially stunning shot into a hazy mess.
My go-to strategy here actually depends on what kind of shot I’m aiming for. If I’m capturing a cityscape, sometimes embracing the light pollution and using it to create a glowing effect can be beautiful, especially with a strong foreground subject.
But if I’m after stars or a truly dark landscape, getting away from urban centers is non-negotiable. I’ve spent countless hours driving out to quieter spots; even just a few miles can make a huge difference.
When you’re in a truly dark spot, the challenge shifts from too much light to not enough. That’s where those long exposures I mentioned earlier really come into play.
Experiment with exposures up to 15-20 seconds if your drone and conditions allow. Another trick I’ve picked up is using a low-light filter, though you need to be careful as they can sometimes introduce color shifts.
What’s truly helped me, though, is scouting locations during the day to understand the terrain and potential hazards, and then using my drone’s mapping features or even a dedicated app to find the darkest sky areas.
It’s a bit of a dance, balancing the available light with your creative vision, but the results are always worth the effort!
Q: Is it even safe to fly my drone at night, and what are some key safety tips I should always follow?
A: This is incredibly important, and I can’t stress enough that safety should always be your number one priority, especially when flying after dark. The short answer is yes, it can be safe, but it requires extra vigilance and adherence to regulations.
From my own experiences, the biggest challenge is visibility. It’s much harder to judge distances, identify obstacles like power lines or tree branches, and even keep track of your drone visually.
Always make sure your drone has working navigation lights, and if possible, add some strobes or extra LED lights for better visibility. Before you even think about lifting off, always conduct a thorough pre-flight check in daylight or with a strong flashlight.
Check your propellers, battery levels, and sensors. Know your local drone regulations inside and out – many areas have specific rules about night flying, some requiring special permits or waivers.
Never fly over crowds, near airports, or in restricted airspace. I always fly with a spotter, someone who can keep an eye on the drone and the surrounding area while I’m focused on the camera feed.
And for goodness sake, start small! Don’t attempt complex maneuvers or tricky shots on your first night flight. Practice in an open, familiar area until you’re comfortable.
A little caution goes a long way in ensuring your drone, and everyone around it, stays safe!